ZION TANG

  • 主页
  • 随笔
所有文章 友链 关于我

ZION TANG

  • 主页
  • 随笔

SV - fork join_none套用循环的易错点

2019-11-27
Fork join_none

SV - fork join_none 套用循环时需要注意的点

在验证过程中,我们不得不接触fork join_none配合循环的例子。例如,我们在Monitor需要检测多个通道的输出,可能就需要用到fork join_none。让程序后台生成多个线程,同时Monitor监测的多路结果输出到对应通道的scoreboard中。

又比如,假设DUT有4个数据口。我们需要在UVM的body()函数里把4个sequence同时挂载到对应的psequencer上,可能也会用到这种语法(详见下图)。或许有看客想到,这种我不是可以用fork join实现吗?诚然,但是如果你有300个sequence呢?难道光是一个挂载sequence的代码就300行吗?
Fork join_none

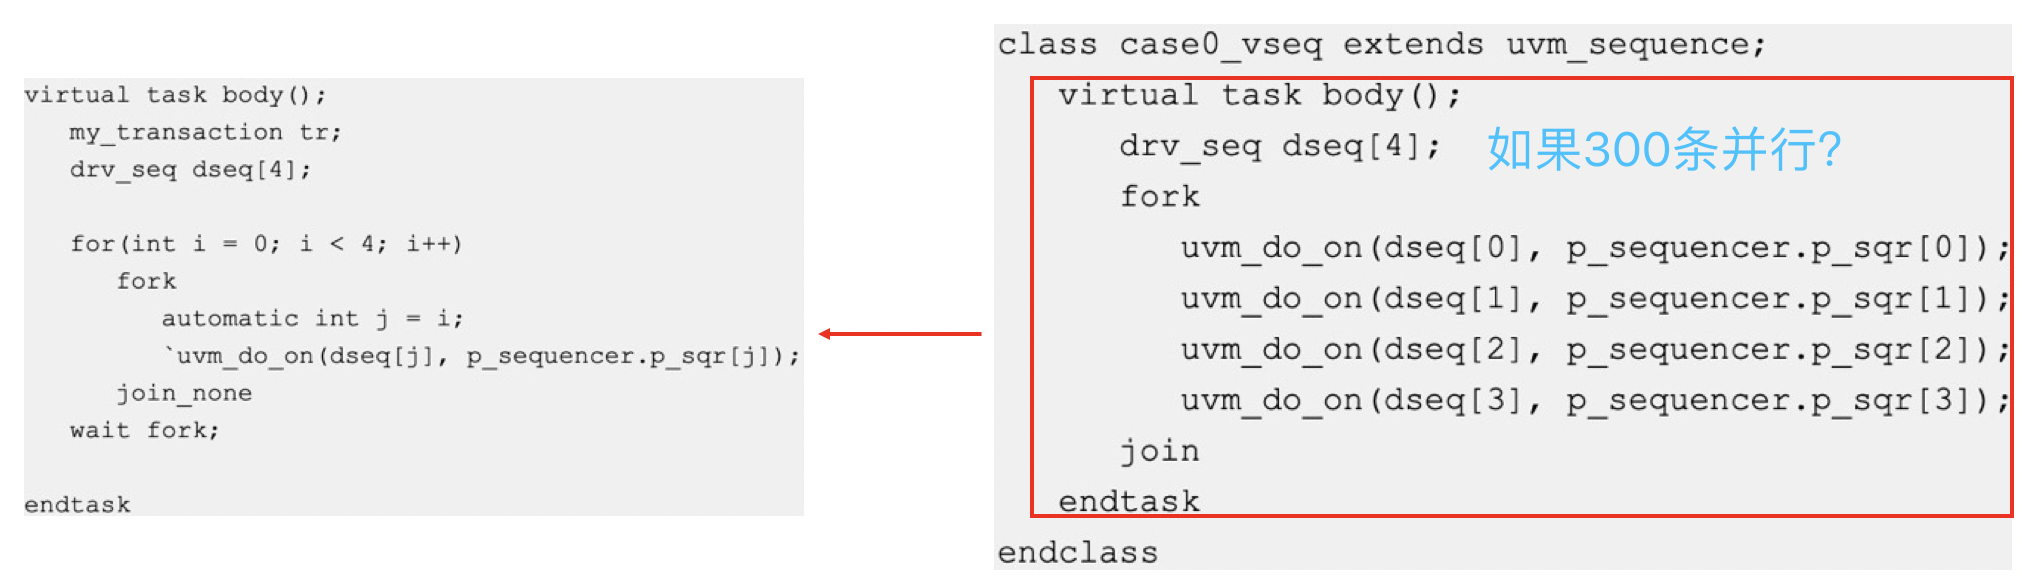
注:此处的wait fork不可以省略。因为系统在挂载成功后,会直接进入endtask。此后,系统认为sequence已执行完毕,从而清理sequence之前占据的空间。事实上,这几个sequence根本没有执行。

目录

  • Fork join_none的automaic问题
    动态变量的创建时间
    什么是procedual_statement
    静态程序
    改善第1步
    改善第2步
    引生的问题
  • Fork join_none的位置问题
  • Fork join_none中使用begin end
  • references

Automaic问题

动态变量的创建时间

我们首先需要明确一个概念:Automatic variables get created upon entry and initialized before executing any procedural statement within the block they are located in.

什么是procedual_statement

以下的语句都是procedural statement:

1
2
3
4
5
initial // enable this statement at the beginning of simulation and execute it only once
final // do this statement once at the end of simulation
always, always_comb, always_latch, always_ff // loop forever
task // do these statements whenever the task is called
function // do these statements whenever the function is called and return a value

静态程序

首先来看看,下面这个例子。program是静态的,所以 i 是一个静态变量,这个临时变量 i 会用一个存储空间。所以最终输出的值应该是 i 的最终值5。

1
2
3
4
5
6
7
8
9
10
11
12
13
14
15
program fork_join;

initial begin
for(int i = 0; i < 5; i++)
fork
send(i);
join_none
wait fork;
end

task send(int j);
$display("driving port %0d" , j);
endtask // send

endprogram
1
2
3
4
5
driving port 5
driving port 5
driving port 5
driving port 5
driving port 5

改善第1步

为改善之前的状态,我们需要将program声明为动态的。但是我们会发现发现子线程拿到的 i 依旧最后保存的5。这又是为什么呢?

这是因为send(i)是一个独立的statement位于fork join_none中,所以fork join_none会先生成5个子线程,再去创建和初始化变量i。所以最终5个子线程拿到的是 i=5。

1
2
3
4
5
6
7
8
9
10
11
12
13
14
15
program automatic fork_join;

initial begin
for(int i = 0; i < 5; i++)
fork
send(i);
join_none
wait fork;
end

task send(int j);
$display("driving port %0d" , j);
endtask // send

endprogram
1
2
3
4
5
driving port 5
driving port 5
driving port 5
driving port 5
driving port 5

改善第2步

开篇提到,动态变量的创建和初始化是优先于task这个procedural statement的。我们不如多申请一个临时的动态变量 j。并且每次循环时,并行的把当前的 i 赋值给 j(注意此时不能时候用begin end,否则将会把两个statement包裹成为一个statement,出现类似于上个程序的情况)。这样让5个在线程可以拿到分配了5个空间的变量temp。这样最终可以使得子线程拿到 0 - 4的变化值。

1
2
3
4
5
6
7
8
9
10
11
12
13
14
15
16
program automatic fork_join;

initial begin
for(int i = 0; i < 5; i++)
fork
int j = i;
send(j);
join_none
wait fork;
end

task send(int j);
$display("driving port %0d" , j);
endtask // send

endprogram
1
2
3
4
5
driving port 0
driving port 1
driving port 2
driving port 3
driving port 4

引生的问题:

有同学可能会有疑惑,例2中的task send(int j)不是有一个变量吗?难道send(i)的时候不会做形式参数的拷贝吗?
确实,也会做拷贝。但是send里的形式参数j是栈里的局部变量,这个变量不是动态的。让我做一个测试,将这个形式参数声明为automatic:

1
2
3
4
5
6
7
8
9
10
11
12
13
14
15
16
program automatic fork_join;

initial begin
for(int i = 0; i < 5; i++)
fork
int j = i;
send(j);
join_none
wait fork;
end

task send(automatic int j);
$display("driving port %0d" , j);
endtask // send

endprogram
1
2
3
Error-[IDM] Invalid declaration modifier
testbench.sv, 12
Modifier 'automatic' cannot be used in a task/function ref port declaration.

从报错信息看,这个automatic并不能作为task的参数声明。

Join_none的位置问题

目前,我们的fork join_none都是在for循环下做声明。假设我们声明在task内部有会怎么样呢?

1
2
3
4
5
6
7
8
9
10
11
12
13
14
15
program automatic fork_join;

initial begin
for(int i = 0; i < 5; i++)
send(i);
wait fork;
end

task send(int j);
fork
$display("driving port %0d" , j);
join_none
endtask // send

endprogram
1
2
3
4
5
driving port 0
driving port 1
driving port 2
driving port 3
driving port 4

从结果上看出,因为每次给task的时候,i 的值会更新,所以子线程拿到的就是5个不同的变量i。

Join_none中使用begin end

有同学可能有疑惑,假如我们把例3的程序中的并行线程改成串行,会有什么结果呢?让我回顾一下之前讲的内容:这是因为begin end将两个statement包裹成了是一个独立的statement,所以fork join_none会先生成5个子线程,再去创建和初始化变量i。

让我们看看仿真结果:

1
2
3
4
5
6
7
8
9
10
11
12
13
14
15
16
17
18
program automatic fork_join;

initial begin
for(int i = 0; i < 5; i++)
fork
begin
int j = i;
send(j);
end
join_none
wait fork;
end

task send(int j);
$display("driving port %0d" , j);
endtask // send

endprogram
1
2
3
4
5
driving port 5
driving port 5
driving port 5
driving port 5
driving port 5

references

  1. https://verificationacademy.com/forums/systemverilog/fork-joinnone-inside-loop
  2. http://www.asic-world.com/systemverilog/procedure_ctrl1.html
  3. 张强. UVM 实战[M]. Ji xie gong ye chu ban she, 2014.

展开全文 >>

UVM - 验证随机reset(phase jump)

2019-11-07

UVM(phase jump)

笔者在收集代码覆盖率时,曾发现无论自己打多少激励,FSM覆盖率总是cover不完全。分析后,发现是因为cover不到任意状态跳转复位状态。

一般咱们会将这种优先级低的case放在最后,甚至直接不验证。但是从完备性的角度考虑,这种case是需要验证到的。

但是这里引升了一个问题,DUT是消耗仿真时间的,任意时刻的随机复位势必会对我们的reference model造成影响。特别是当reference model是不消耗仿真时间的function时。

就这个问题,UVM具体又怎么做呢?是不是引出其他问题呢?本文就随机复位的情况,给出UVM的解决方案。

  • Phase间的跳转
  • Jump后组件的处理
  • Jump后TLM的处理
  • sequence和driver握手问题
  • references

phase间的跳转

其实要验证随机的复位不难,只是需要调用到UVM实战第5章中讲到的phase jump的概念。我们需要做的是,在driver/monitor里对复位信号做一个实时监测,如果复位有效,就立即将phase跳转到reset phase里:

1
2
3
4
5
6
7
begin
while(1) begin
@(negedge vif.rstn_i);
`uvm_info(get_type_name(), "Monitor a reset!", UVM_MEDIUM)
phase.jump(uvm_reset_phase::get()); //跳转到reset phase
end
end

注意,此处的rstn是低有效,所以监测的是rstn的下降沿。此时,UVM将自动将所有的组件跳转到reset phase里。

Jump后组件的处理

此刻我们需要将所有的组件还原到DUT上电复位的状态。即:

1
2
3
driver:应该给出复位是的驱动
monitor:应该将所有用到的counter,临时变量等清零
scoreboard:需要把用于比较数据的队列清空

Jump后TLM的处理

对于喜欢用TLM_FIFO的朋友,我们也不能忘记将TLM中的FIFO清空。此时,我们仅仅需要调用TLM_FIFO的内置函数flush。以下是uvm_tlm_fifos.svh的源码:

1
2
3
4
5
6
7
8
9
10
11
12
13
14
15
16
17
18
19
20
  // Function: flush
//
// Removes all entries from the FIFO, after which <used> returns 0
// and <is_empty> returns 1.

virtual function void flush();
T t;
bit r;

r = 1;
while( r ) r = try_get( t ) ;

if( m.num() > 0 && m_pending_blocked_gets != 0 ) begin
uvm_report_error("flush failed" ,
"there are blocked gets preventing the flush", UVM_NONE);
end

endfunction

endclass

sequence和driver握手问题

在phase jump之后,会因为driver调用两次get_next_item()操作而出现UVM ERROR:

1
UVM_ERROR @ 8514ns: uvm_test_top.env.agt_blake.seqr [uvm_test_top.env.agt_blake.seqr] Get_next_item called twice without item_done or get in between

为解决这个问题,我们需要再次使用sequencer的内嵌函数stop_sequences()去清除所有对sequence的请求:

1
2
3
4
5
6
7
8
9
10
11
12
13
class blake_sequencer extends uvm_sequencer #(blake_trans);

function new(string name, uvm_component parent);
super.new(name, parent);
endfunction

`uvm_component_utils(blake_sequencer)

virtual task reset_phase(uvm_phase phase);
stop_sequences();
$display("we stop seqr for random reset!");
endtask
endclass

以下是stop_sequences()在uvm_sequencer.svh中源码:

1
2
3
4
5
6
7
8
9
10
11
12
13
14
15
16
17
18
// Function- stop_sequences
//
// Tells the sequencer to kill all sequences and child sequences currently
// operating on the sequencer, and remove all requests, locks and responses
// that are currently queued. This essentially resets the sequencer to an
// idle state.
//
function void uvm_sequencer::stop_sequences();
REQ t;
super.stop_sequences();
sequence_item_requested = 0;
get_next_item_called = 0;
// Empty the request fifo
if (m_req_fifo.used()) begin
uvm_report_info(get_full_name(), "Sequences stopped. Removing request from sequencer fifo");
while (m_req_fifo.try_get(t));
end
endfunction

references

  1. 张强. UVM 实战[M]. Ji xie gong ye chu ban she, 2014.

展开全文 >>

SV断言的小技巧及实用例子

2019-10-29

SVA(SV断言手段)

SVA是一种强大的验证手段,本文将介绍一些工作中实用的方式。

  • 验证寄存一拍
  • SVA调用function
  • SVA实现循环检查
  • SVA实现FIFO空满检验
  • references

验证寄存一拍

之前接触过一个DUT,子模块的部分输入打两拍后输出给下一级子模块。如果使用UVM,专门写一个monitor,一个scoreboard会表现出一种杀鸡焉用牛刀的感觉。其实,这种和时序密切相关的输出,可以直接使用SVA:

1
2
3
4
Title: UVM大哥和SVA小老弟
Input->Output: 寄存两拍
SVA->Output: 大哥,小弟先上!
UVM->SVA: SVA小老弟,杀鸡沿用牛刀?
1
2
3
4
5
property cmd_wrdata_check;
bit[32:0] data;
@(posedge clk_i)
disable iff (!rstn_i) (1, data = data_i) |=>##1 (data == data_o);
endproperty

Explain:断言中的信号值实际上是时钟沿到来之前的值。所以,对于非阻塞复制:b<=a逻辑的断言应该是:“@ (posedge clk) (1,tmp=a) |=> (b==tmp);”。上例多延时一拍”##1“,从而实现了寄存两拍的效果。

调用function

SVA还可以对保存的数据做简单的处理。这个类似于写一个reference model,并且实现每个cycle级别的检查。

1
2
3
Title: DUT大哥和SVA小老弟
Input->Output:我怎么才能知道输出不会出现01,10的情况
SVA->Output: DUT大哥,我来调function!
1
2
3
4
5
6
7
8
9
10
11
12
property wren_check;
@(posedge clk_i)
disable iff(!rstn_i) (1) |-> (checking_wren()) ;
endproperty

function checking_wren();
bit [11:0] temp;
for(int i=0; i<12; i++) begin
temp[i] = source_wren[2*i] ^ source_wren[2*i+1];
end
checking_wren = ~(&temp);
endfunction

Explain:例2使用了断言可以调用function,从而检查了相邻bit位不能出现01,10的情况。结合例1,聪明的你是否也发现,SVA还可以利用function的结果作为下一级的判断条件呢?

实现循环检查

验证小伙儿又犯难了,这次要让他验证一个clock gating。这个gating被总共例划了的12份。所有都一样,只是hierarchy中行列号不同。写12个断言吧,不是不行,只是显得冗余。

1
2
3
Title: 重复和SVA小老弟
Input->Output:我有12个clock gating呢!
SVA->Output: 重复劳动我也能解决!
1
2
3
4
5
6
7
8
9
10
11
12
13
14
property clock_gate_check(signal1, signal2);
@(posedge clk_i)
disable iff (!rstn_i) (!signal1) |-> (!signal2);
endproperty

generate
for(genvar i=0; i<6; i++) begin: assert_ck_i
for(genvar j=0; j<2; j++) begin: assert_ck_j
assert property(clock_gate_check(
test_top.dut.row[i].col[j].en,
test_top.dut.row[i].col[j].clk_gate.en));
end
end
endgenerate

Explain:例3显示利用property生成一个模板,然后使用generate语句重复调用这个模板,从而实现了对12个clock gating的验证。

FIFO空满检验

断言在验证FIFO的空满标志时也非常实用。

1
2
3
Title: FIFO和SVA小老弟
Input->Output:我的空满能验吗?
SVA->Output: Easy!
1
2
3
4
5
6
7
8
9
10
11
12
13
14
15
16
17
18
19
20
21
22
23
24
25
26
27
28
29
30
31
32
33
34
35
36
37
38
39
40
41
42
//counter
reg [15:0] w_cnt,r_cnt;
wire [15:0] cnt;
always@(posedge wif.clk)begin
if(~wif.rstn)
w_cnt<=16'b0;
else if(wif.en)
w_cnt<=w_cnt+1;
end
always@(posedge rif.clk)begin
if(~rif.rstn)
r_cnt<=16'b0;
else if(rif.en)
r_cnt<=r_cnt+1;
end
//check current counter
assign cnt=w_cnt-r_cnt;

//check full
property full_chk;
@(posedge wif.clk) disable iff(~wif.rstn)
cnt==32 && $rose(cnt[5]) |-> $rose(wif.valid);
endproperty

a_full_chk: assert property(full_chk)
$display("check full pass");
else
$display("ERROR: check full fail");
c_full_chk: cover property(full_chk);

//check empty
property empty_chk;
@(posedge rif.clk) disable iff(~rif.rstn)
cnt==0 && $fell(cnt[0]) |-> $rose(rif.valid);
endproperty


a_empty_chk: assert property(empty_chk)
$display("check empty pass");
else
$display("ERROR: check empty fail");
c_empty_chk: cover property(empty_chk);

Explain:例4验证的是一个深度为32的FIFO,通过利用读写两个counter去记录目前为止。一旦满了,cnt=32,full应该立即拉高。一旦为空,cnt=0,empty应该立即拉高。

references

  1. Mehta A B. SystemVerilog Assertions and Functional Coverage[M]. Springer., 2014.
  2. http://blog.sina.com.cn/s/blog_4c270c730101f6mw.html

展开全文 >>

Vim插件推荐-IC验证工程师

2019-10-28

IC验证工程师常用Vim插件

很多工程师所在公司的服务器是离线的。
本质旨在介绍如何离线安装vim插件,及个别插件的推荐。所有插件均注明出处。

  • SV 语法高亮
  • Vim 美化
  • NERDTree
  • rainbow
  • indentline
  • cursorword
  • References

SV语法高亮

主要是为了支持对于SV语法的高亮

Installation

1
2
3
4
5
6
7
8
9
Download tarball:

https://github.com/nachumk/systemverilog.vim/archive/master.zip

Extract files:

unzip -j ~/Downloads/systemverilog.vim-master.zip systemverilog.vim-master/ftdetect/systemverilog.vim -d ~/.vim/ftdetect
unzip -j ~/Downloads/systemverilog.vim-master.zip systemverilog.vim-master/indent/systemverilog.vim -d ~/.vim/indent
unzip -j ~/Downloads/systemverilog.vim-master.zip systemverilog.vim-master/syntax/systemverilog.vim -d ~/.vim/syntax

Vim美化

img

Installation

1
2
download https://github.com/vim-airline/vim-airline
copy all of the files into your `~/.vim` directory

NERDTree

树状显示文件路径:

1
2
3
4
5
6
7
8
folder1/
└── folder2/
├── folder3/
│ ├── file1
│ └── file2
└── folder4/
├── file3
└── file4

Installation

1
2
download https://github.com/scrooloose/nerdtree
copy all of the files into your `~/.vim` directory

rainbow

括号层级用不同颜色显示。

lisp

lisp

Installation

1
2
download https://github.com/luochen1990/rainbow
copy all of the files into your `~/.vim` directory

indentline

虚线对齐缩进。

Installation

1
2
download https://github.com/vim-scripts/indentLine.vim
copy all of the files into your `~/.vim` directory

cursorword

将相同字符标注下划线。
vim-cursorword

Installation

1
2
download https://github.com/itchyny/vim-cursorword
copy all of the files into your `~/.vim` directory

References

https://vimawesome.com/
https://github.com/vim-scripts

展开全文 >>

© 2019 ZION TANG
Hexo Theme Yilia by Litten
  • 所有文章
  • 友链
  • 关于我

tag:

    缺失模块。
    1、请确保node版本大于6.2
    2、在博客根目录(注意不是yilia根目录)执行以下命令:
    npm i hexo-generator-json-content --save

    3、在根目录_config.yml里添加配置:

      jsonContent:
        meta: false
        pages: false
        posts:
          title: true
          date: true
          path: true
          text: false
          raw: false
          content: false
          slug: false
          updated: false
          comments: false
          link: false
          permalink: false
          excerpt: false
          categories: false
          tags: true
    

Bitmain IC验证工程师一枚,熟悉SV,SVA,UVM。 了解Palladium Z1 ICE,SA,DPA flow